Share
Pin
Tweet
Send
Share
Send
We remake an ordinary light bulb into an LED.
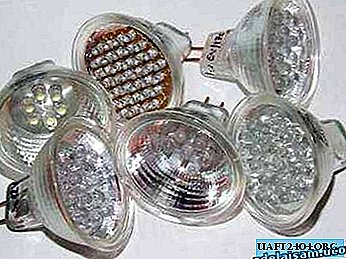
The photo shows examples of manufactured holders for LEDs. Using this technology, you can make a holder of any shape for LEDs of various sizes and with any number of them.

To work, you will need:

1. Reflector;
2. LEDs;
3. Superglue;
4. Resistors;
5. Solder and soldering iron;
6. Aluminum plate (for the manufacture of a holder plate, any durable material can be used).
Operating procedure:
First you need to draw up a connection diagram of the LEDs and select the values of the resistances (resistors). It’s very convenient to use the service //led.linear1.org/led.wiz It is in English, so the following is a translation of the names of the fields that need to be filled: Source voltage
LED supply voltage (diode forward voltage)
LED current consumption (diode forward current (mA))
The number of LEDs to install (number of LEDs in your array).
Check the box (wiring diagram)
Check the box (help with resistor color codes)
We click on the button and we get a circuit with ready-made resistors. Example -

Next, we remove the old lamp from the reflector. Take a small screwdriver and carefully pick out the white resin that secures the light bulb.

Next, we make a plate for attaching the LEDs. It is convenient to use an aluminum plate, as the material is soft and easy to work with. For the manufacture of plates with holes, it is convenient to first prepare a layout on paper using graphic programs on a computer. Then print the project on paper and stick it on the plate from which the holder will be made. Drill holes in designated areas.

Install the plate on a convenient stand and start placing the LEDs in the drilled holes, you need to monitor the placement of the LED contacts for proper assembly of the electrical circuit.

It is better to fix the LEDs with super glue immediately.

After installing all the LEDs, you can still add glue to make the design more reliable. We proceed to the assembly of the electrical circuit.

It is advisable not to overheat the LEDs. If any LED fails, it will be difficult to replace it; you will have to tear it from the glue. When everything is ready, solder the resistors.


Be careful not to short-circuit any contacts.

Solder the lamp leads. In order not to confuse the conclusions (+ and -) in the future, make the conclusion "-" shorter. We connect power to test the performance of our design. Fill all contacts with molten plastic to prevent them from touching. You can fill it with ordinary paraffin: melt an ordinary candle, draw the molten paraffin with a disposable syringe and fill the contacts.

We begin to assemble the LED lamp.


We fix the contacts in the reflector. Fill the contacts with molten plastic. You can also use many other materials (epoxy resin, etc.).


We mark our lamp. This must be done. Do not rely on memory.

Trim the excess conclusions.

We turn on the power and enjoy. The lamp can be used for installation in a flashlight or in any other illuminator (headlights for a car, bulbs for furniture, etc.).

Share
Pin
Tweet
Send
Share
Send