Share
Pin
Tweet
Send
Share
Send
Starting work, I cut out paper parts - parts from which it will be necessary to make a sample of the future toy. The sample will tell you what the finished toy will look like, how many parts it will need, and what parts will be needed. The sample glued by me from paper parts looks like this:

So it looks on the side:

Next, I take a white cloth and cut out of it the first three parts in the form of paper samples with a small indent (allowance). These are the details of the head:

Now I need to cut out four parts of the wings and two parts of the body:

To connect the sides from below, I need to cut out the bottom part:

Next, I fold the parts of the head and neck in pairs, turning them inside out and stitching, leaving a small area for the beak unstitched. To the front side of the neck you need to sew on a part that will connect the bottom of the craft with its upper part:

Then I sew the bottom part with the sides of the body:

Now I need to stitch the details of the wings:

Now I turn the head of the craft out of the wrong side and cut out two parts of the beak for it from cardboard, according to the size of the craft's head:

I paint these details in black and pink with varnish:

After waiting for the varnish applied to the eyes and beak to dry, I fill the head of the toy with cotton and stick them to its front:

So the resulting head of the future toy looks on the other hand:

Next, we remove paper samples from the stitched parts of the body and turn the parts from the wrong side, after which we fill the toys with cotton wool:

This is how the torso detail looks after filling:

Now it remains for us to turn out the details of the wings from the inside and introduce the filler into them. After that, we will need to sew up the areas through which cotton wool was introduced, and sew them to the body with a detail of the head. This is what the resulting toy looks like:
So she looks on the other side:

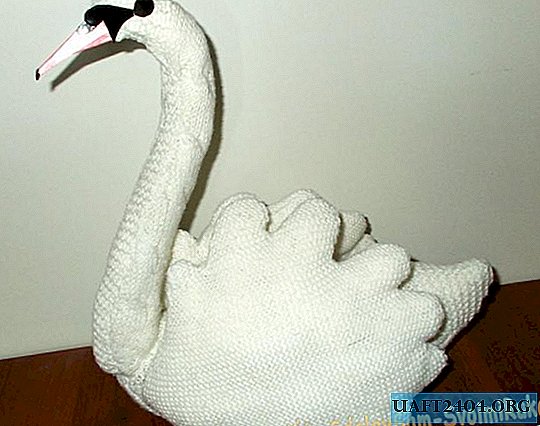
Our craft is almost ready. It remains to decorate it with white beads, stringing them on a thread or on a fishing line, and decorate them with wings or a head with a neck. After that, our craft will be ready:

So it will look on the other side:

So she looks in front:

I hope that this toy can become a good decoration for the room or a gift for children. We wish you success in good deeds!
Share
Pin
Tweet
Send
Share
Send