Share
Pin
Tweet
Send
Share
Send
To work you will need:
- Jigsaw;
- Power Planer;
- Grinder;
- Drill or screwdriver;
- Drill and screws;
- Clamps;
- PVA glue;
- Square, pencil, compass;
- Brush for painting;
- Sandpaper;
- Varnish, stain;
- Wood.
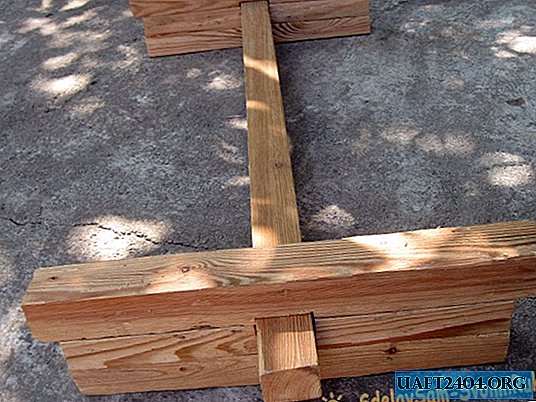
The first stage of work is the assembly of the bottom of the chaise. For its manufacture, a beam of 50x50 mm will be required. You need to fasten together three beams, two of which will be 30 cm long, and the third 35 cm. The 35 cm long beam should be on top, since the wheels will later be attached to it. However, note that the second beam must be cut in the middle, so that another 50x50 cm beam can be inserted into it. You need two units of such parts. The length of the strand will be 120 cm. Cut this size of the beam with a jigsaw. Then thread this 120 cm beam into the two parts you made. Use PVA glue as a fastener, and also fasten the structure with self-tapping screws. Before tightening the screw, drill a hole for it. This will allow you to avoid chipping wood.

Next, you can proceed to the assembly of the upper part of the chaise. To do this, you need a board with a thickness of 10 - 20 cm. You need to prepare two boards 120x15 cm. And two boards 120x20 cm. It is not necessary to choose a clean forest of the first grade. On the contrary, it is very beautiful to use wood with knots, chips that look natural. This will add aesthetics to your product. In addition, you can artificially trim with the help of a jigsaw the edges of these boards, which will also give the appearance of "antique".

You also need to make two parts in the shape of a trapezoid. The first trapezoid, which will be at the back of the shingle, should be 30 cm high. To do this, take a 40x30 cm board. If there is not one, you can glue two boards together to get the required size. Next, draw a trapezoid on this board the upper part, which should have 30 cm, and the bottom 40 cm. The second trapezoid should be lower. To do this, take a 40x25 cm board. Then draw a trapezoid on it, which will be 40 cm at the bottom and 30 cm at the top.


Next, you can start assembling the cart. Attach to the trapezoid on both sides of the board that were previously harvested. The lower part of the chaise also needs to be typed with a board. When assembling, use self-tapping screws and PVA glue. On the side of the keychain where the trapeze is attached lower, attach a 40 cm long board that will be the keychain seat.


Now you can start making wheels. Two wheels of the cart will have a diameter of 25 cm, and two more wheels will have a diameter of 35 cm. To make a wheel, you will need a 50 cm thick edged board. The wider the board, the better. Take a compass and draw a circle with a diameter of 35 cm on the board. Then, draw a circle with a diameter of 30 cm from the same point. After that, cut the wheel that you drew on the board with a jigsaw. The inside of the large wheel is 10 cm in diameter. It also needs to be cut from a 50 cm thick board. Next, you need to drill 8 holes in the wheel rim with a diameter of 15 mm. It is of this diameter that the spokes should be. After that, thread the spokes into the wheels, and fasten them with PVA glue. Small wheels are made in the same way. A circle with a diameter of 25 cm is drawn on a blackboard with a compass, and a circle with a diameter of 20 cm is drawn from the same point. The inner circle will be 10 cm in diameter. If you do not have a 35 or 25 cm thick board, then you can glue two boards together. To do this, it is necessary to process both sides on a plane, then thoroughly grease them with PVA glue, and fasten with clamps.


Next, the wheels are attached to the bottom of the cart, to a beam, which has projections of 5 cm. You can fix the wheels with long screws or a bolt.


Now you can sand the product in order to prepare it for painting. After the cart is fully assembled, it must be opened with a stain. You can choose the color of the stain to your taste. However, lighter tones combine perfectly with the green of the lawn and greenery. Next, you need to handle the cart well with varnish or drying oil. It is better to use high-quality varnish, which will well protect the wood from moisture, as this decoration will be on the street.


Such a product will add a twist to the design of your summer cottage, and perfectly decorate it. You can pleasantly surprise your guests with this unique and exclusive decoration. Typically, a chaise is used as a flower stand.


Share
Pin
Tweet
Send
Share
Send