Share
Pin
Tweet
Send
Share
Send
The main advantage of the charger is that it is fully automatic. The circuit monitors and stabilizes the desired battery charging current, controls the battery voltage and how it reaches the desired level - reduces the current to zero.
What batteries can be charged?
Almost everything: lithium-ion, nickel-cadmium, lead and others. The scope of application is limited only by the charge current and voltage.
For all domestic needs this will be enough. For example, if your built-in charge controller is broken, you can replace it with this circuit. Cordless screwdrivers, vacuum cleaners, lights and other devices can be charged with this automatic charger, even car and motorcycle batteries.
Where else can you apply the scheme?
In addition to the charger, you can use this circuit as a charging controller for alternative energy sources, such as a solar battery.
Also, the circuit can be used as an adjustable power supply for laboratory purposes with short circuit protection.
Main advantages:
- - Simplicity: the circuit contains only 4 fairly common components.
- - Full autonomy: current and voltage control.
- - LM317 chips have built-in protection against short circuit and overheating.
- - Small dimensions of the end device.
- - Large range of operating voltage 1.2-37 V.
Disadvantages:
- - The charging current is up to 1.5 A. This is most likely not a drawback, but a characteristic, but I will define this parameter here.
- - At a current greater than 0.5 A, it requires installation on a radiator. The difference between input and output voltage should also be considered. The greater this difference, the more microcircuits will be heated.
Auto Charger Scheme
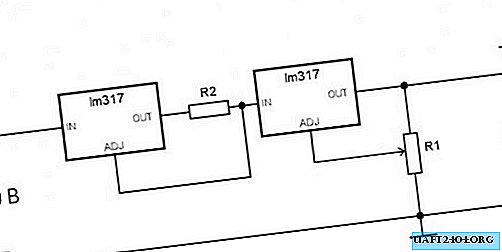
The diagram does not show the power source, but only the adjustment unit. A power supply can be a transformer with a rectifier bridge, a laptop power supply (19 V), a telephone power supply (5 V). It all depends on what goals you pursue.
The scheme can be divided into two parts, each of them functions separately. The first LM317 has a current stabilizer. The stabilization resistor is calculated simply: "1.25 / 1 = 1.25 Ohms", where 1.25 is a constant that is always the same for everyone and "1" is the stabilization current you need. We calculate, then choose the nearest resistor from the line. The higher the current, the more power the resistor needs to take. For current from 1 A - at least 5 watts.
The second half is a voltage stabilizer. Everything is simple, you set the voltage of the charged battery with a variable resistor. For example, in automotive batteries, it is somewhere equal to 14.2-14.4. To configure, we connect a 1 kΩ load resistor to the input and measure the voltage with a multimeter. We expose the desired voltage with the interline resistor and that's it. As soon as the battery is charged and the voltage reaches the set, the microcircuit will reduce the current to zero, and charging will stop.
I personally used such a device to charge lithium-ion batteries. It's no secret that they need to be charged correctly and if a mistake is made, they can even explode. This memory copes with all tasks.


To control the presence of charge, you can use the circuit described in this article - Current presence indicator.
There is also a scheme for incorporating this microcircuit into one: and stabilization of current and voltage. But in this case, not quite linear work is observed, but in some cases it may work.
An informative video, only not in Russian, but the calculation formulas can be understood.
Share
Pin
Tweet
Send
Share
Send