Share
Pin
Tweet
Send
Share
Send
It's no secret that second glue + soda is a reliable and durable bonding of surfaces. It doesn't matter which, not necessarily even homogeneous. Plastic + iron, plastics + glass, iron + glass ... You can go on and on! The only important rule is that the surfaces are not wet or greasy. But for these purposes, there is a solvent. Let's say; if we glue wood and, for example, plastics, and the wood is wet, it is not necessary to wait until it dries - this is a rather long process! You just need to generously moisten the required area of wood with a solvent. The solvent mixes very quickly with the water in the tree and dries almost immediately with moisture. At least from the top layer that we need for the connection. Now we will consider several options for connecting different and homogeneous surfaces. No tools are needed for the job. Except, perhaps, sandpaper, in case an inaccurate connection occurs and you need to remove the mixture of glue and soda that has accumulated in an unnecessary place. So, let's begin.
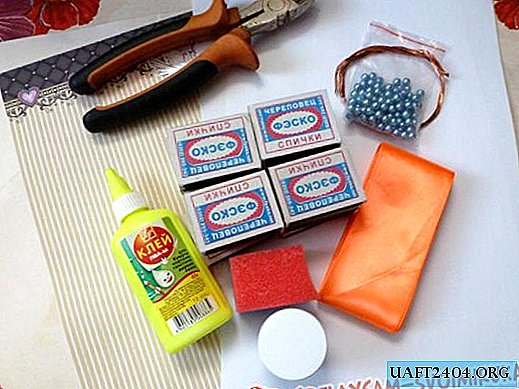
Will need
- Seconds glue.
- Soda.
- Glued surfaces
- Sandpaper (just in case!).

We glue two surfaces tightly
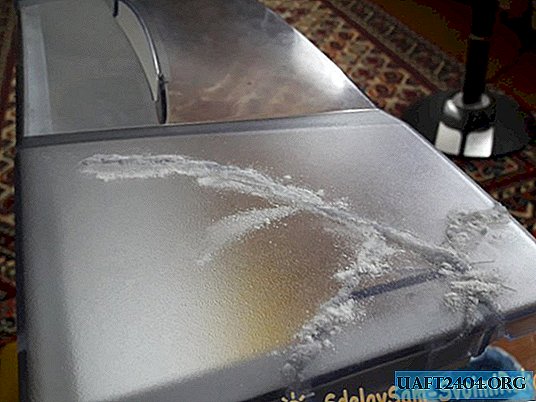
First, glue two homogeneous surfaces. In my case, this is a cracked compartment from the freezer.

At first I tried to solder it with a wood burner, but after some time it burst again in the same places. Now, I am sure that the fastening will be more reliable. We will glue on the outside so that the glue does not come into contact with the products. So, with the help of a second glue, we will glue the glued surfaces so that they do not play during the main work.

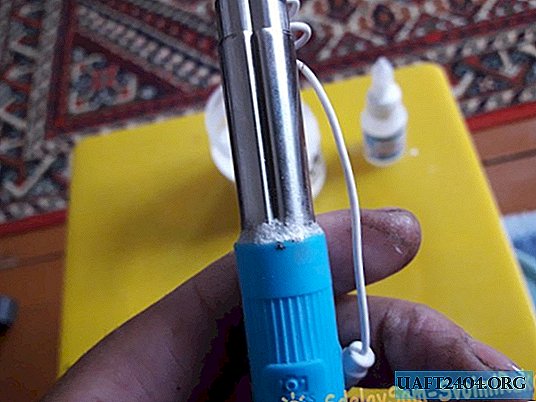
Now that the surface is fixed and does not move, apply a layer of glue to the crack. Do not hustle and hurry: although the glue is instant, it can not dry out for a long time until it comes into contact with something. After we put the glue, spill the crack with soda.
We wait a couple of seconds, and blow off the remaining soda. Repeat the procedure on top of a new seam to fix the result. And now we have a reliable connection!

Now glue two homogeneous parts from the inside. Previously, in modeling and making mock-ups (small copies of something), I always faced the problem of the perfect appearance of the model - how to glue it so that no seams were visible. At first I used cold welding, but it dries for a very long time. And if massive glued surfaces have an area of only a couple of millimeters, one superglue will not be enough for a reliable connection. For instance; I assembled a model of a cruise missile.

Its basis consists of a metal-plastic tube with a diameter of 16 mm. How to glue two pieces of pipe so that the seams do not stick out? When gluing identical tubes there will be no problems - you can just take the cylinder with the desired diameter and put both parts of the tube on it, pre-lubricating them with glue.


However, gluing the shank to a rocket, which has a much smaller diameter, and also gradually expanding towards the end (the bell, in which the cap was from a similar glue), was even easier; just insert the bell cone into the tube, drop 10-15 drops of glue from the other end of the pipe and pour soda there.


That's all! After a couple of seconds, pour the remaining soda. Do not come up with more reliable mounts!

Now connect the tree. Under my favorite indoor pepper I gathered a small decoration (also, a kind of model!) From wood: two slingshots, a crossbeam and a bowler.

But when assembling the model "bonfire", again, I was helped by soda with glue. After cutting the tiny poles, I wiped them with a solvent to remove the remaining moisture from the wood and, one by one, putting them on top of each other, dripped glue and immediately sprinkled soda.

Despite the fact that the whole structure is constantly exposed to water, when watering a plant, the tree will more likely decay than the compound will decay!
It will be a little more difficult to connect the plastic from the bottle with the same plastic, or something foreign. The plastic from the bottle has a very smooth surface. In addition, he is extremely flexible. Here sandpaper will help out. With its help, we simply clean the surface of the plastic, making it rough.


Thanks to micro-scratches, the glued surfaces tightly cling to each other. And in order to avoid a possible lag along the edges of these surfaces, again, we dig glue along their perimeter and immediately fill it with soda.


Now glue the metal and rubber. Having spared money, and having bought a cheap Chinese selfie stick, my daughter asked me to somehow fix the rubber handle (which constantly moved along the entire length of the stick like a living one!), On the metal base of the stick. In fact, this handle is a flexible rubber tube stretched over a metal base.

Without thinking twice, I resorted to the method of gluing, which has already become a favorite, and applied glue to the place where the rubber touches the metal and repeated the procedure with soda.
In general, you can continue as long as you like, just not list. The main thing is to remember the basic principles of this gluing method: the first - superglue does not tolerate moisture and fat when glued, and the second - if the working surface is very smooth; use sandpaper.
Share
Pin
Tweet
Send
Share
Send