Share
Pin
Tweet
Send
Share
Send
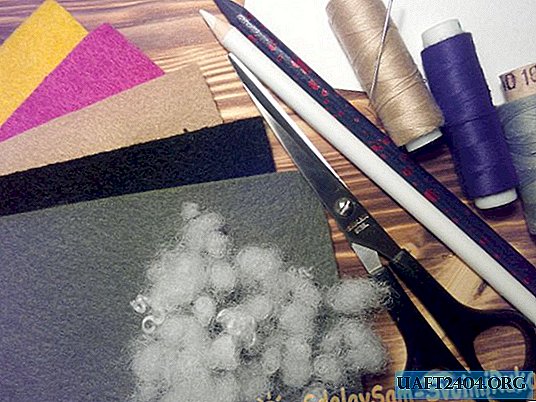
Here is what you need:
- Felt material with a soft structure of dark green, black, sand colors.
- Small pieces of felt of juicy colors (bright yellow and pink) for a flower.
- Threads of beige, black, swamp shades.
- Needle for sewing or embroidery.
- Scissors.
- A simple pencil, a chalk marker.
- A piece of cardboard.
- A small amount of holofiber.
1. Print and cut cactus and pot patterns on the printer.

2. From beige felt, cut one piece for the pot: base, bottom and rim. From black felt, cut a circle about 8-10 cm in diameter to simulate the earth.

3. From felt of a dark green shade, cut 5-6 identical details for the cactus. From pink and yellow felt, make one identical detail of the flower. Make a stripe for the middle of the inflorescence of any bright color.

4. Take the wide rounded part (the base of the pot) and connect its short edges. Sew them with beige threads using a butt or lap seam.

5. Take the bottom of the pot, sew to the base with a sewing stitch (or over the edge).

6. Take a narrow rounded strip, sew it short slices butt. Then wrap the pot on top of this part and sew along the inner contour. To do this, lay the finishing line in the form of a dotted line.

7. Then connect the upper edges of the pot and rim with overcasting seam or any other as you wish. Spread the pot, give it a beautiful shape.

8. From the cardboard cut out a circle the size of the bottom of the pot. It is needed for sustainability.

9. Place the cardboard circle on the bottom of the pot. Check to see if it fits the bottom well.

10. Pull the black circle towards you, pass the thread around its edge.

11. Pull the thread, put the holofiber inside.

12. Tighten the thread, fasten the tie with a few stitches and a knot. Use your fingers to form a rounded part with a smooth spherical surface.

13. Remove the pot. Put a ball simulating soil into a pot. If it does not completely fill the space of the pot, pull it out and put some synthetic filler on the bottom.

14. Put the soil in a pot, align it with your fingers so that it is evenly distributed over the entire top.

15. Take the green elements of the cactus. Fold them in two, sew in a basting seam in pairs.

16. In the middle of the fastened parts, lay a vertical line, piercing the needle through the material.

17. Then sequentially attach all the details of the cactus to each other, stitching together their midpoints.

18. Sew the main part of the cactus to the soil, capturing all sections of the base.

19. Make sure that the sides of the plant are distributed evenly on the surface of the earth (you can first pin them with pins). Put the cactus in the pot.

20. Take the parts of the inflorescence, sew them to each other in the middle.

21. Cut the strip-core on one side with scissors into small pieces. On the other hand, do not cut the strips to the edge.

22. Twist the strip into a roll.

23. Sew the core to the flower with hidden stitches.

24. Place the flower on top of the cactus or in another place where you want. Sew an inflorescence to a cactus.

25. Flatten the petals of the inflorescence and the edges of the cactus with your hands, giving them the desired shape.


Share
Pin
Tweet
Send
Share
Send